
Search the Community
Showing results for tags 'paperclay'.
-

Renovating a 1/2” scale East Side Townhouse
peonyfoxburr posted a topic in Real Good Toys Dollhouses
Hello all, I just acquired a mostly-built RGT 1/2” scale East Side Townhouse. The seller included a bag of trim, which I haven’t looked at yet, but the house is all put together, window frames in, shingles applied, and exterior painted/finished. The main thing I want to do with the outside is to re-surface all the exterior walls with paperclay. At present there is paint on about half, and a stone paper applied to the rest. I have actually spent some time in New York brownstones (on the East Side, even!), and this isn’t what they look like. So, I have several questions to put out—I think I know what I want to do, but want to hear others’ opinions about methods and so on. I have found an excellent paperclay tutorial linked within posts on this forum. The natural color of brownstone varies—it is actually a type of sandstone—but would it be better to pre-color the paperclay medium before rolling it out, to a sort of baseline dark reddish-brown color, and then do color washes to achieve the variations? Or should the paperclay go on, get texturized, and dry, before any paint is applied? (And is ordinary acrylic paint the right thing to use?) As I said above, most trim has already gone on. With a thickness of 1/8” to the paperclay, will the trim (especially window frames) look too recessed? I have to look at some more photos to refresh my memory, but my recollection is that windows are set right into the blocks of stone in the NY brownstones. So this may be a moot point. I will now attempt to include a photo, but since I didn’t review the procedure before starting this post, bear with me!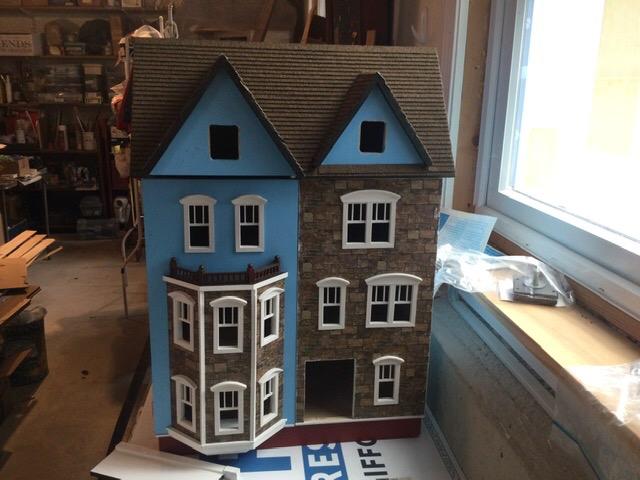
-

From the album: Glencroft
Yet another wash over the bricks, and a base coat on the 'stones' around the doorway© Aaron Cameron
- 3 comments
-
- 1
-

-
- glencroft dollhouse
- paperclay
- (and 2 more)
-
I know many of you have used Creative Paperclay and the like to create various finishes on projects ( Tracy @Minis On The Edge and Karin @WyckedWood off the top of my head). I am going to attempt to use it as roofing for my Christmas cottage. The idea is to roll it out to about 1/8" thick and use a scalloped oval cookie cutter for the "tiles". The roof surface with dormers is about 514 sq in. The cookie cutter I have is about 1-1/2" w x 2" l. I estimate with overlap that I will need about 350 "cookies". I have 4 lbs of Creative Paperclay so far. How much more would you estimate that I will need? Any pointers you can give will be appreciated very much!
-

From the album: Glencroft
© Aaron Cameron
-

From the album: Glencroft
Yet another wash over the bricks, and a base coat on the 'stones' around the doorway© Aaron Cameron
- 1 comment
-
- 2
-
-
- glencroft dollhouse
- kitbash
- (and 2 more)
-

From the album: Glencroft
Started dry brushing on various reds, cream, and dark brown tonight, will build up a base of colour and then a final wash or two of very thin brown to tone the bricks. The stones around the doorway will be painted cream I think.© Aaron Cameron
-

From the album: Glencroft
second wash in a cream colour, next step will be to drybrush reds and browns over the high points© Aaron Cameron
-

-

From the album: Glencroft
© Aaron Cameron
-

From the album: Duracraft Newberg
-

From the album: Sugarplum Dollhouse
Well, kitchenette is almost there. And I have to say I love the sink and faucet. The Dura Clear Gloss Barnish is fantastic. For anyone who is somewhat creative, I recommend 100% creating your very own custom kitchen. It's time consuming but so rewarding. Don't think I would ever buy a kitchen setup.....maybe a fridge or stove, but not the cabinetry -

From the album: Sugarplum Dollhouse
First coat of paint done on stone. I'm so excited to see the exterior stone come together, although I wish I would have done a more intricate front stoop.- 6 comments
-
- 1
-
-
- paperclay
- dollhouse exterior
- (and 2 more)
-

From the album: Sugarplum Dollhouse
finishing up front patio overhang. Have to start working on framing our windows while waiting for lead tape to arrive. I want to thank you all for inspiring to go further. I'm absolutely loving all these new techniques I'm learning.- 10 comments
-
- 1
-
-
- sugarplum dollhouse
- sugarplum
- (and 4 more)
-

From the album: Dura Craft Tudor by WyckedWood
Shingles done. Love the roof line on this house, after I modified it. -

From the album: Dura Craft Tudor by WyckedWood
Shingles done. Love the roof line on this house -

From the album: Sugarplum Dollhouse
I'm in love with Paper Clay. I used Das and it was pretty easy. Time consu,OMG but relatively easy. I used about 3/4 to finish off half height of the house and the interior fireplace. i can totally see getting addicted to designing a house. I love doing that with Life size houses- 7 comments
-
- 4
-
-
- paperclay
- sugarplum dollhouse
- (and 4 more)
-

From the album: Sugarplum Dollhouse
-

From the album: The Garfield by S. Mehreen
I have finished adding brick borders to the 30 windows! I especially like the borders around the tower windows and the oval windows. Read more at: http://thegarfieldblog.blogspot.com/2014/04/brick-borders-complete.html -

From the album: Trying new things
Here is my latest house, delivered to the customer. This is a half scale (1:24th) Log Mansion. The base kit is the Alisha Dollhouse by Laser Dollhouses with alot of bashing and additions. Paperclay stonework interior and extierior. Plaster and beam interior, blood sweat and tears! More on ye olde blog! Minifanaticus Blog© Minifanaticus
-

From the album: The Appleby Cottage
I finally took the plunge and covered the back wall, using Paperclay and Bromley stencils.© checkmouse
- 3 comments
-
- 3
-
-
- paperclay
- bromley stencil
- (and 1 more)
-

-

From the album: Glencroft
I ended up repainting the stonework while I was playing with my house today, the watercolour washes had faded quite a bit and the "mortar lines" weren't as visible as I would like, the acrylics give a much more.. defined colour, but now I wish i'd gone with a brick pattern rather than stone, the red wash looked so good on it. -

From the album: 2014 HBS Creatin' Contest--Erabliere Aucoin, Sugar Shack and Shop
Detail of the finished exterior stonework, showing the deep colors of the stone and the final medium-grey grout color. -

From the album: 2014 HBS Creatin' Contest--Erabliere Aucoin, Sugar Shack and Shop
In this shot you see the faux-concrete chimney top (this is called "flaunching"—the things I learn for minis!!), and the "terra-cotta" chimney pots, which I molded of polymer clay. I had originally planned to put a metal "cap" over the lot (these keep out birds, squirrels, and debris), but the cute chimney pots got lost under it, so I decided it looks like the Aucoins are going to have squirrel and woodpecker damage someday, but they don't know that yet. ^_^ -

From the album: 2014 HBS Creatin' Contest--Erabliere Aucoin, Sugar Shack and Shop
The finished chimney. Worth mentioning that a chimney of this size (remember from the earlier pictures that the stonework goes up the inside wall as well) is VERY heavy. Easily tripled the weight of the building. I had built and attached the base-extension very strongly to take the weight, but honestly if I knew then what I know now I might have attached the extension even more sturdily. It doesn't seem to be creaking or in any way complaining, but I always like to overbuild rather than risk underbuilding. (Hopefully, that habit of mine means I did overbuild enough.)


.jpg.1b45713637b337cf0e097b21b8431f39.thumb.jpg.ac6e0e5be6b32f15165c7420db9a6222.jpg)


