


Kells
-
Posts
1,133 -
Joined
-
Last visited
-
Days Won
32
Content Type
Forums
Gallery
Events
Blogs
Downloads
Articles
Posts posted by Kells
-
-
This is amazing work!! I wish this seller linked to a blog in his/her listings so I could have another look at the French Quarter pub they sold last year. It was as incredible as this one.
https://www.ebay.com/itm/363540100520


-
On 9/15/2021 at 6:00 AM, havanaholly said:
Why not go with the white trim to match the dormer window? Maybe leave the porch railing the color it is, to see if you like it any better.
The window in the dormer is unpainted bare wood. The as-found pics show the house with its original white windows, but those seemed to stick out like a sore thumb with the other two colors.
-
The floor is beautiful! I think you made the right choice skipping wainscoting. It could lead a viewer's eye away from the floors and detract/distract more than enhance.
-
21 hours ago, KathieB said:
Apparently it is pissed at me for ignoring it for so long and intends to keep me engaged as long as it can.
LOL! I have a couple that must be using the same playbook.
1 hour ago, KathieB said:Working on the inlaid floor in the foyer/hall. See it here. I started out with visions of intricate parquet, but it has evolved into something with cleaner lines and less cutting and fitting.

Now, do I want wainscoting in the hall?

That is going to be one beautiful floor. As for wainscoting, have you considered anaglypta or lincrusta? There are some stamped/embossed dollhouse sheets that would work. I've been wanting to try out the copper ones. You could probably easily paint the white unpainted ones to look like tooled leather, which was pretty common for wainscoting in Victorians.
-
3 hours ago, havanaholly said:
On my monitor the trim looks more like an oxblood red; definitely not a color scheme I'm attracted to.
Upon closer inspection, I think it might be barn red. If that's the case, I have a house with a similar color scheme, so serves me right for hating on that one, lol! Yee-gads, now I'm thinking maybe I'd better repaint.
https://forum.greenleafdollhouses.com/gallery/album/8654-craftsman-cottage/
-
1 hour ago, fov said:
Not a big fan of the color scheme on that one, but I like the fancy shingles on the gables and the tower roof.
We are on the same page re: the color scheme. That would look so much better with white or cream trim everywhere instead of that brown.
-
Another Visalian! $649. This is what happens when you search for things like "Visalian Dollhouse." You end up on Craigslist postings a thousand miles away from your home.
https://portland.craigslist.org/clc/art/d/yakima-doll-house-story-furnished/7380015550.html

-
13 hours ago, Medieval said:
or is there a ghost in my attic? Lol
"Ghost in My Attic" sounds like a good album name. Or a euphemism for Bats in the Belfry, HAHA.
-
 1
1
-
-
13 hours ago, fov said:
The one at Shellie's was actually her personal Nob Hill, which the Morningside was based on. More details here if you haven't seen this thread before.
I bet it's not a coincidence that the Nob Hill was something Shellie designed and sold from her shop, and this dollhouse is for sale just a few towns over.
I actually didn't know she designed that house, so thank you for the info. I guess that's why I couldn't find a pic, I was searching for Morningside instead of Nob Hill.
That Seaside Villa with Lawbre windows is great btw!
-
19 hours ago, fov said:
Anyone know what this is? I feel like I've seen this design before but I can't place it. https://www.facebook.com/marketplace/item/4693304270688128/?ref=search&referral_code=marketplace_search&referral_story_type=post
Here's a Seaside Villa shell in Sausalito CA, with Lawbre windows: https://www.facebook.com/marketplace/item/227827405977198/
(When you consider the cost of those windows, the shell is practically free!)
It looks kind of like the Morningside except that it's missing the tower on top.
Pic won't embed, here's a link, although this is the 1/24 version. Shellie's had a fantastic one but I can't find a pic of that.
https://i.pinimg.com/originals/be/df/f6/bedff611a461738f9abc4dbb5bcb9fe7.png
I can't see the second one, the Seaside Villa. It takes me to a general dollhouse search. But I saw this one when I scrolled down. Love it, and only $125, dang.
-
1
-
-
It's a shame you lost the original, Muriel, but look at it this way, now you get to create what you really want from the same kit. Take it from someone who's done both, starting from scratch is a heckuva lot easier than rehabbing one that's already built and finished!
-
I really wasn't trying to bring anyone down, just remembering happy times with my mom. Sad story for what happened to the dollhouse though! I'm not going to recreate it. I've considered it many times but the past is past. I have too many dollhouses as it is, and I definitely don't need another colonial.
Thankfully, I didn't give my cousin the contents of the house. She filled it with old Tomy, Renwal and Marx plastic furniture appropriate for a child. Too bad she didn't think how inappropriate a detailed dollhouse was for a kid, right?? Except for the earliest pieces I did that were so badly finished, I actually still have most of that furniture. Much of it is in my James River Tidewater house. Give a quick scan of the pics and I bet you'll recognize some of those kits!
https://forum.greenleafdollhouses.com/gallery/album/8407-1730-tidewater-plantation-house/
-
I'm feeling maudlin today but I knew only the members of this forum would understand what a dollhouse can mean to a person. I came across a padded envelope at the bottom of a box while searching for something else. Inside was the door from my very first dollhouse. Well, my first REAL dollhouse anyway. My first was some horrible Arrow kit that eventually ended up where it belonged: in a fireplace, haha. I let a cousin have my coveted dollhouse when I went off to college. She let her daughter play with it from ages 2 through 5. Nothing survived but a couple dormers and the chimneys - which I've since used on another house - and the front door.
Norm, of Norm's Dollhouses in Colorado, built the house for me, before he was sadly murdered. I paid for it with what little money I made at a crappy summer job serving ice cream at a Baskin Robbins when I was in my early teens. I bet I had to work half a day at minimum wage just to pay for this Carlson's front door!
On a summer trip to Williamsburg, my mother picked up some pretty watercolors from a local artist of colonial homes in town. Those paintings hung on either side of a maple hutch in our breakfast nook, along with some pewter and painted plates. My house was based on one of them. We took the painting to Norm and basically requested a 1/12th copy of it.
I went on the hunt to find a picture or painting of that house (no idea what happened to the original watercolors my mother had) and found a photo of the house. I remember that painting very well, and this is the house.
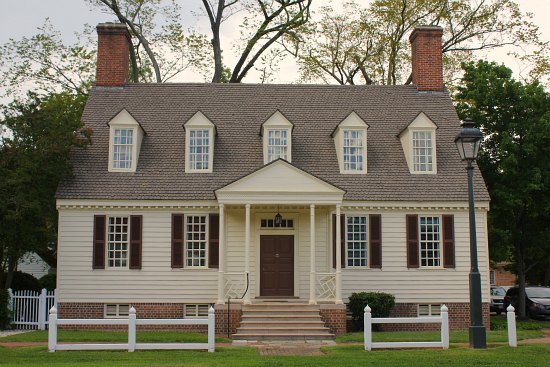
I omitted the porch on my dollhouse and the roof was shorter, due to the dimensions of the dollhouse. It was about 48" long (exterior incl. roof), 18" deep. Nice size rooms, 18" square on either side of a wide center hallway. The chimneys weren't as tall. And, of course, I stuck on the Carlson's front door. I edited that photograph above and got very close to what my dollhouse looked like!
Pic at the bottom. The door on my edit is a photo I just took of the actual front door I just found that somehow miraculously survived Toddler Armageddon.
Finding this door got me a bit teary-eyed thinking of that dollhouse, but mostly my mother. Taking me to the library to check out books of colonial interiors so I could spend hours poring over furniture, accessories, fireplaces, paneling details, etc. Helping me build half the kits House of Miniatures ever made in order to furnish it. Finding fabric scraps that kinda-sorta passed for quilts but really didn't, and were probably things I wouldn't dream of putting into a dollhouse now that I know better, lol. Mom letting me make all the decisions but diplomatically guiding me with comments like, "The colonists really didn't use a color like purple in their homes . . . " or, "This style of chair didn't exist until the 1850s . . ."
Anyway, thanks for letting me wander down memory lane. Here's the pic I edited. I got it pretty darn close to what my dollhouse looked like! How I wish I had an actual photograph. But at least I have many happy memories of it and the time spent on it with Mom. If this brought up any memories for you, please share!

-
4 minutes ago, havanaholly said:
I made the exterior first floor of my Orchid general store "stone":
I primed the exterior with flat white interior latex paint and when it was dry I spread spackle (you can use joint compound) 1/8" or so thick with an expired credit card and drew my "stones" in the wet spackle with a pointed toothpick and when the spackle was all completely dry I painted the "stones".
Thanks, Holly! You replied just as I was posting so I hadn't seen this. Question, do you have a preference for spackle vs. drywall compound for a project such as this? I suppose I could try them both on scrap wood. Did you seal yours afterward? I need to keep mine from looking the least bit shiny, so there's another issue I have to contend with.
-
31 minutes ago, fov said:
I have to do a foundation for the house I'm working on and I'm looking for alternatives to egg cartons, just because I'm tired of them and want to try something different. Haven't found a good alternative, so I'll probably do the egg cartons again. But I spent some time looking at life sized stone/pebble tiles. Would something like this work for the exterior of your house?
Wow, I like that! I'm going to have a look at Home Depot next time I'm there. I wanted a river rock foundation for my Gambrel and this may work. I fear it might add a lot of weight to this one though. It is already very heavy. Also, I posted the wrong picture. I stuck in stone I'd used turning this into a Buck County, PA sort of Colonial stone house rather than the stone I borrowed from one of the pics above of an actual Mallorcan house. The rock used on those houses is flatter, much less rounded than river rock / pebble stone. My fault for misleading.
Have you checked out those embossed papers I mentioned? If you search on Ebay for 1/24 Embossed Stone, you'll find a variety of styles. They are actually very nice! They have a 3-D effect and aren't just printed flat. The brick papers go together pretty well. I was unhappy with how the stone papers joined. They're 8" x 11". I don't know how long your foundation pieces are, but in 1/24th scale you might not have the issue of seams at all. Another plus of working in half-scale!
2 hours ago, KathieB said:I used joint compound/wallboard mud to do the foundation of my first Orchid. I spread a thin layer of the compound and then used a toothpick to draw individual stones. When it dried, I sanded off the little peaks that had popped up in places and did a little shaping with an emery board, then painted the stones. Onnce it dries, the mud does not add a lot of weight to the project.
This is the method I plan to use for the limestone flooring throughout the ground floor. Weirdly, I didn't think of it for exterior stone. Thought it would be too flat. Well, yeah, if I smoothed it out it would be, lol. That looks great on your Orchid! I could see that working for me. Especially since, like I said above, I posted the wrong picture, duh. My rock needs to be flatter and more elongated, not a lot of little round ones.
Apologies for belaboring the issue but here's the correct pic. Besides the difference in stone, this one also doesn't have framing at all the corners of the house. Your comment on your pic explains how you went around the corners. This is also something I very much needed to figure out, so thank you!

-
(sigh) All of my other projects just may take a back seat to this one, but I'll explain why in a second. First, my question. How to do stone has been covered many times on this forum (I know, because I've searched). The egg carton method is my favorite. I've done it successfully on foundations. Or at least successfully IMO; I was happy with them. BUT... how does one do stone siding on a large house?
I got some embossed stone papers. Although pretty, they are not seamless. They look exactly what they are. Oh look, you stuck a bunch of 8" x 11" stone sheets all over your house!
Plastruct stone sheets are a maybe, but it would be a whole lot of work trying to spackle / drywall compound / paperclay the joins so they blend together.
And there is no way on God's green earth I am doing the egg carton method all over a huge house! So, I am at an impasse.
I am not a fan of Magic Brick, to put it mildly, but I've never used their Magic Ston without an E. I could see that working well on a foundation but has anyone ever used it to do an entire house?
So why the sudden shift from other projects I've got going? Well, I have an ulterior motive. My husband could not care less about dollhouses. Say the word "Victorian" to him and his eyes glaze over. I try (unsuccessfully) to keep my dollhouse blathering to a minimum. HOWEVER, I showed this idea to him to get a second opinion and he is thrilled. Seriously, he has never been excited about one of my miniature projects, but he is over the moon about this one. I'm pretty happy about the fact he wants to be part of this. He practically has the jigsaw in hand ready to chop down the roof line (it's too steep) and enlarge all the window and door openings (not one of which fits standard component sizes).
I've had an old Stanley Colonial for at least a decade. It was falling apart when I got it and it's only grown worse. This thing must be 40-years old. I have a baggie inside the house collecting all the window mullions that keep falling out. The siding is atrocious and needs to come off. And the interiors! Good lord, I don't know what the original decorator had in mind but it certainly wasn't Colonial. Think lots of floral Victorian wallpaper and out-of-scale billowy satin curtains.
You've all seen the house, it's built from these plans. Mine is exact, even the same color.

Here are some of my inspiration photos for the exterior and interiors. Mallorca is one of our favorite places. I love the architecture but I am especially excited about the interiors. I'd get to use some contemporary furniture, artwork and acessories I've never had a place for, yet still work in some "antique" French and Spanish pieces. French limestone floors, simple and clean white plaster walls, dark beams. I think it would be lovely!


And finally, here's my Photoshop mock-up. I have most of these components. I'd finally get to use the (USELESS!!) additions off my Rosedawn, but at least those came with these pretty doors. I've done Spanish barrel tile roof so I've got that down (these are taken from a photograph of the roof on our actual house, lol). BUT THERE'S STILL THE ISSUE OF THAT MUCH STONEWORK! I could cry thinking of having to do that much in the egg carton method.
Is anyone still reading??? HELP!

-
You always do such great work and this room is no exception.
-
2 hours ago, havanaholly said:
You can also use them vertically for beadboard. Good find!
Yep, and I'm going to! 😀 I'm really impressed by Brae's creativity. It's certainly something I never thought of doing.
Just so no one considering using these feels that I steered them wrong, I need to explain that "waviness" I mentioned. I laid out twenty of these to mock-up my siding. Out of those twenty, three were seriously off. By "off", I mean that about halfway along their length, they started to curve off to one side. Like, seriously WAAAAY off to one side. Imagine a freeway off-ramp. That's what they looked like.
However, I need my siding staggered to look realistic, so I'd be cutting some anyway. And like I said, it was really only about half of the stick that would go to waste, and then on only about three out of twenty. Wanted to make that clear to anyone reading this.
Personally, I would not use these for flooring. But for beadboard like Brae did or the siding I'm trying to recreate they're pretty choice, especially for the price, even with some waste!
-
Got my siding figured out, cheaper than I ever imagined it could be, and I owe it all to @otterine/ Brae. Thank you, Brae! She proves the usefulness to others of posting our ideas and solutions.
Brae used a bamboo table runner for wall paneling. Here it is in progress, and here it is finished. I realized the beveled/rounded edges of those slats creating a grooved look would also work for what I'm trying to achieve. I went on the hunt but had no luck finding a bamboo table runner or placemats that would work (at least none that didn't cost way too much!), but I came across these bamboo craft sticks:
https://www.ebay.com/itm/313594135319

500 for under $40?? That's 8-cents apiece!!! And 500 is even more than I need. I'll use leftovers to plank the underside of the porch roofs. They're also thin enough to use inside the house for wainscoting. They measure a bit over 1/16" thick and are 3/8" wide.
I received them today and THEY ARE PERFECT!! At least perfect for what I need them for. The rounded long edges aren't a perfect angled bevel but if you scroll up to see the pic of the house I'm trying to do, I think you can see they're just right!
I wouldn't use these for normal clapboarding on a house. Too narrow by the time you overlapped them and some can be a bit wavy, but that imperfection is great for the aged, imperfect look I'm going for. Anywho, thought I'd share because I am just so danged thrilled about this!
-
1
-
-
The term for what you're experiencing is "Paralyzed by Choice." Or also, "Analysis Paralysis." With a hundred thousand options, where do you start? I suggest first narrowing it down by location and going from there. Do you want Parisian shops, London, a quaint English village? Then narrow down further, perhaps looking for shop fronts of the specific types of shops you want to create.
You can set your shops someplace that you've visited or that mean something to you. For me, I'd probably use one of many Colorado mountain towns for inspiration because I know those places so well. Here's an example of one I'd probably do, in Georgetown, CO.
You can use famous shops, and then you have a story behind it, like, "I based this on Shakespeare and Co. in the Latin Quarter of Paris, one of Hemingway's favorite haunts!"
After you've decided on a few, you can save the pics on your phone, go to your local craft/hobby store, and hold the pics up next to the paints to find the colors that match best.
Lastly, pay attention to the sheen. Paris and London shops tend to have a glossier finish. High-gloss can give a nice enameled look but IMO in miniature hi-gloss can come off looking like plastic. I never use high gloss in miniature on anything. Semi-gloss is a good compromise. American and old Western shops tend to be more flat or matte, but flat paint can be a nightmare to keep clean; it shows every smudge. Eggshell works.
-
1
-
-
Exceptional! Everything is perfect, it's like looking into a real kitchen.
-
1
-
-
12 hours ago, peonyfoxburr said:
— would it be better to pre-color the paperclay medium before rolling it out, to a sort of baseline dark reddish-brown color, and then do color washes to achieve the variations?
I use DAS air-drying modeling clay from Michael's. It's the same thing as Paperclay as far as I can tell, having used both. I get it in terracotta for doing brickwork. You still need to paint, colorwash, etc., but no tinting of the base clay is required. I figure if a few bricks get worn down or banged up a bit, the terracotta base color showing through will be a lot less noticeable than white Paperclay.
-
I'd say paints and wallpapers but I likely don't have more of those than many of you, it just feels like I do. One thing I'm confident that I've gone overboard on is dollhouse components. Specifically, windows and doors. I haven't counted but I must have well over a hundred windows and 20 different doors, both interior and exterior, and possibly more. I don't even know why I have some of these. "But this mixed lot of Lawbre windows was such a bargain!" I keep thinking maybe the rescue house will come along that will need them but I sure don't have anything that needs them now! It's nuts.
Btw, this may be a record for necroposting.

-
Thanks, I am thrilled! In looking for that pic (not that everyone doesn't know what chopsticks look like, haha), I found these. I am going to use them for bedposts!

-
1
-


Ebay, Etsy, and Craigslist posts
in General Mini Talk
Posted
I'm not bidding, much as I'd love to have it. The pub sold for $1,600. A bit much for my purse! I think I will ask the seller if there's a link to past works. I'll post it if there is.